
Improve Performance with Nuxt Image

I built my website with Nuxt quite a while ago and have since used it as my playground for testing out features. My site contains everything you could imagine it to have and more and over time it has grown so much. It is never perfect, never done, but I am proud of how it looks and above all I am very happy with it's performance.
Running Lighthouse Tests
Like many other people out there I open the dev tools and analyze the performance of my site. Running the lighthouse test shows me I have a full score of 100 all round. Nuxt helps you with all these performance benefits out of the box. Although I did do some extra work to make sure things were even more performant such as adding a PWA. If you are not sure how to add a PWA to your Nuxt site then check out my video, Progressive Web Apps in Nuxt.
Also I tip I highly recommend is to run your performance tests on a new profile window so that you don't have any interference from any chrome extensions. I have one profile called performance and use that one every time I want a more real reading.
So if my site is getting full 100% on performance then there is no more work to be done here. Right? Well this is one of the things we do wrong most of the time. We analyze the main page of the site. The home page that in my case is very simple. It only contains a few images. It is a simple page so the performance is great. But just because the home page is performant does not mean the rest of the site is. Really we should analyze the pages that have the most content, the most JavaScript and the most images.
You can imagine how shocked I was when I ran the test on this page and got only 54 for performance. This is terrible. My very cool and performant site is actually performing terrible when there is a normal amount of content on the page. The Lighthouse test tells you where you are going wrong with links to learn more. If you are unsure of how to read LightHouse tests you can check out this free course on Performance Audits.

Running WebPageTest
When it comes to testing your site Lighthouse is a great tool but sometimes you just want to understand a bit more of what is going on. For this I use WebPageTest. WebPageTest is a great tool that allows you to test your site against different browsers and devices. It also allows you to test your site against different connection types.
Analyzing the Waterfall View
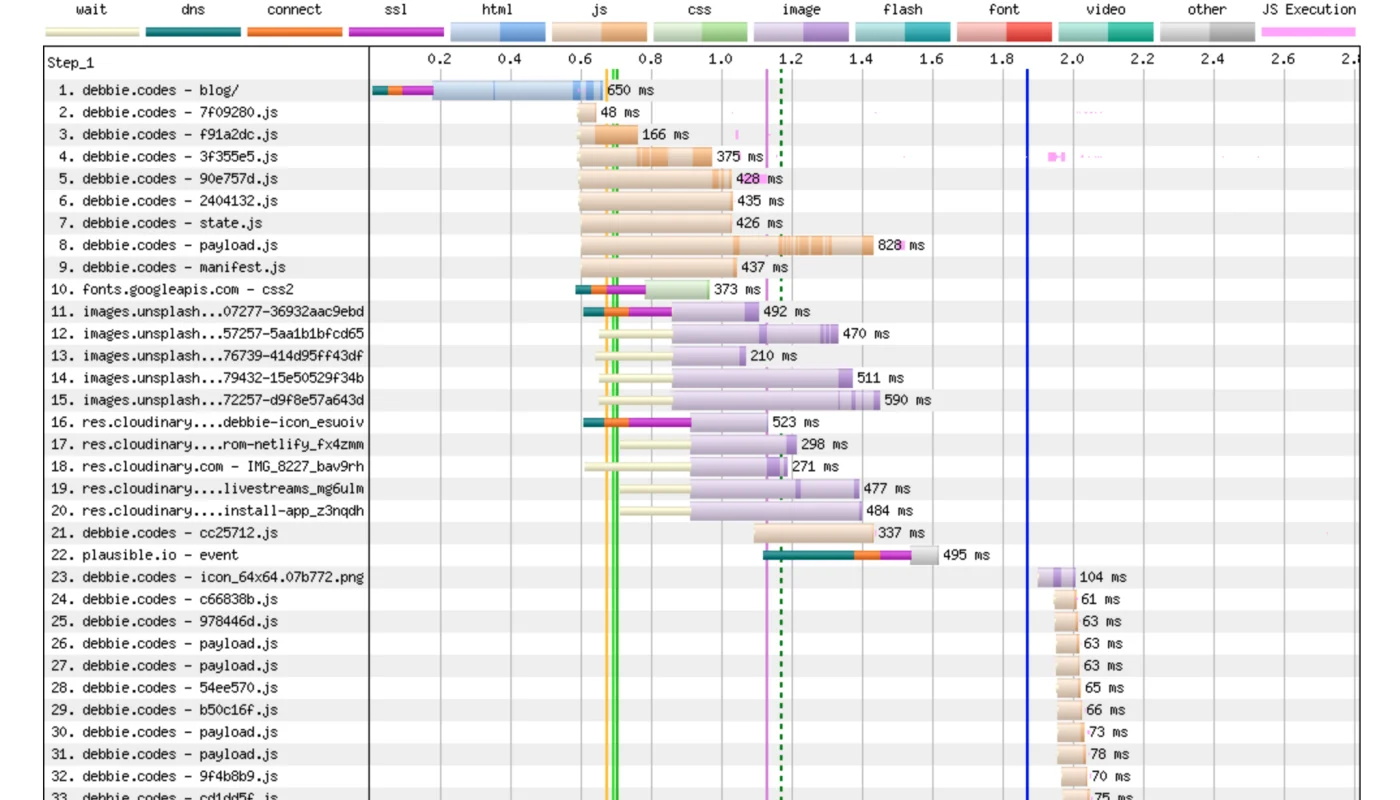
Once the test finishes running you can start to analyze where things are going wrong. The first thing we can look at is the waterfall view. This might seem scary to look at at first but it is actually very helpful. It shows you the different parts of the site that are taking the most time. For example the first thing you see is the first paint. This is the first time the browser is able to paint anything on the screen. This is a good indicator of how fast the site is loading.
As the name suggests it is a waterfall view and most people know what a waterfall should look like. It should go down but at a slight angle as the water falls. If you take a look at my waterfall view, well it is far from a waterfall. Line 12 to line 13 is crazy looking. The lines below it also. As you can see they are coloured purple which means they are images. What all this means is that my images or these images in specific are taking a long time to load and are affecting the performance of this page.

Largest Contentful Paint
What a disaster. In fact if you look at the numbers the Largest Contentful paint is at 9416ms which is crazy big. A good score is anything under 2.5 seconds, needs improvement is anything from 2.5 to 4 seconds and a bad score is 4 seconds or more. Mine was more than 9 seconds. And it was just the home page of my blog. Nothing amazing just some cards with images on them.
Content Breakdown
WebPageTest gives you the possibility to see your content load in video format. Watching the page load can show you what is taking the most time. You can also take a look at the Content breakdown by MIME type of your site. Looking at mine this page was 90% images. This is a huge amount and no page should be 90% images unless you're selling some sort of photography on line or something. And checking the domain tab I could see my images were coming from 2 providers, Cloudinary and Unsplash. From the images tab you can run an Image Analysis of the page and see what improvements your page will have if you improve your images. Mine was showing 3.7MB for images and I could easily get this town to 235kb. That is a massive improvement.
What does my site Cost?
By running my site though What Does My Site Cost I could see that it was ridiculously expensive for someone to ready my blog depending on what country they were from. My content is amazing of course but this was too much. I had to improve this.
Inspecting the Image
So what exactly was going on with my images? I was already using Cloudinary. Surely they would just be performant out of the box. From the video I could see that the main image for the Largest Contentful paint was the image in the middle. Inspecting this image showed me even more. The image was rendering at a size of 480px x 256px yet the Intrinsic size, the size that an image will be displayed if no CSS is applied to change the rendering, was 4032px x 3024px and the overall size of the file was 1.5MB. This is crazy big.

Nuxt Image
This is where Nuxt Image comes to the rescue. Nuxt Image is a Plug-and-play image optimization for Nuxt apps. Resize and transform your images in your code using built-in optimizer or your favorite images CDN. Sounds just what I need. <NuxtImg> or <nuxt-img> outputs a native img tag directly so you use it just like you would use the <img> tag.
Installing Nuxt Image
The first thing you need to do is install Nuxt Image. You can do this by running yarn add --dev @nuxt/image in your project. Then add the module to buildModules section in your nuxt.config, or modules section if not using target static.
export default {
  target: 'static',
  buildModules: ['@nuxt/image']
}
Props for Nuxt Image
Then in your code you use the <NuxtImg> component with the various props.
- src: The source of the image.
- alt: The alt attribute of the image.
- width: The width of the image.
- height: The height of the image.
- loading: The loading state of the image.
- provider: The provider of the image if using Cloudinary/Unsplash etc.
- sizes: The sizes of the image for different screen sizes
- presets: The presets you want to add to the image
- class: The styles for the image.
Using Nuxt Image
<NuxtImg
  provider="cloudinary"
  src="blog/image-of-my-site"
  alt="image of my site"
  loading="lazy"
  preset="blog"
  width="640"
  height="480"
  sizes="sm:355px md:320px lg:480px"
  class="images"
/>
Setting the Providers
The default provider for Nuxt Image is ipx or static (for target: static). Either option can be used without any configuration. Images should be stored in the static/ directory of your project. However if your images are coming from an image provider then you can set the provider to the provider of your choice.
<NuxtImg
  provider="cloudinary"
  src="blog/image-of-my-site"
  alt="image of my site"
/>
If you have images coming from an image provider you can set it in the nuxt.config and then choose which provider it will use. Cloudinary uses the cloudinary provider whereas Unsplash uses the imgix provider.
  image: {
    cloudinary: {
      baseURL: 'https://res.cloudinary.com/your-account-name/image/upload/'
    },
    imgix: {
      baseURL: 'https://images.unsplash.com/'
    },
  },
Setting the Presets
<NuxtImg src="blog/image-of-my-site" alt="image of my site" preset="blog" />
Presets are a set of image modifiers that you can add to your images. By setting these as presets you don't have to add them one by one to each image and it is much easier to modify. You can have more than one preset, just give them a name and add the modifiers that should be applied to that preset.
  image: {
    presets: {
      blog: {
        modifiers: {
          format: 'webp';
          fit: 'cover';
          quality: '60'
        }
      }
    }
  },
The presets we are using here are:
- format: WebP, serves the image as a WebP image when browsers support it.
- fit: Cover, Preserving aspect ratio, ensure the image covers both provided dimensions by cropping/clipping to fit.
- quality: 60, the quality of the image.
Extra Modifiers
As well as the standard modifiers you can also use the the modifiers from the provider. For example if using Cloudinary we can use the roundCorner modifier to add a rounded corner to the image.
<NuxtImg
  provider="cloudinary"
  src="blog/image-of-my-site"
  alt="image of my site"
  :modifiers="{ roundCorner: '0:100' }"
/>
Setting the Width and Height
<NuxtImg
  src="blog/image-of-my-site"
  alt="image of my site"
  width="640"
  height="480"
/>
Setting the image's width and height helps the browser allocate the correct space for the image which ensures that content below the image doesn't shift once the image is loaded.
Setting the sizes
This will create a srcset attribute for the image adding each of the image sizes.
<NuxtImg
  src="blog/image-of-my-site"
  alt="image of my site"
  sizes="sm:355px md:320px lg:480px"
/>
You can define the size of the image to be displayed at different screen sizes. The default screen sizes predefined by Nuxt Image are:
image: {
    screens: {
      xs: 320,
      sm: 640,
      md: 768,
      lg: 1024,
      xl: 1280,
      xxl: 1536,
      '2xl': 1536
    },
  }
Running the Tests against Nuxt Image
Using Nuxt Image instead of the regular tag and adding some basic presets such as quality and format we can see the difference not only by inspecting the code and seeing the file sizes reduced dramatically but also in the waterfall view. Now this is what a waterfall should look like.
Not just is our waterfall view better but our images now only make up 30% of the page, down from 90%. This is a huge improvement. The load time as also been reduced and to a total of 1167ms meaning we are very much in green. Our page now costs a lot less to run and our Lighthouse tests are showing 100%. All this thanks to using Nuxt Image.

Conclusion
It really is time to start moving your images to use Nuxt Image. It will improve your performance tremendously and will make your site much more accessible to everyone. Don't forget to run tests on the pages of your site that are most image heavy and run tests regularly as things can change over time.
If you would like to take a look at the test results for this example you can see it here.